


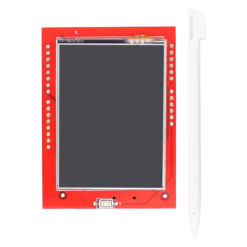

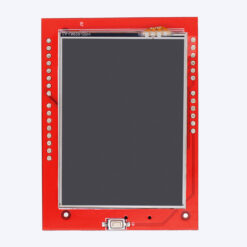
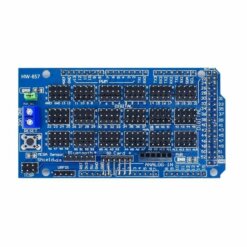
Shield Display TFT 2.4″ Touch para Arduino Uno Mega
$ 182.00
56 disponibles
| CANTIDAD | PRECIO |
|---|---|
| 10 piezas | $ 164.05 |
| 25 piezas | $ 149.73 |
| 35 piezas | $ 137.72 |
INFORMACIÓN
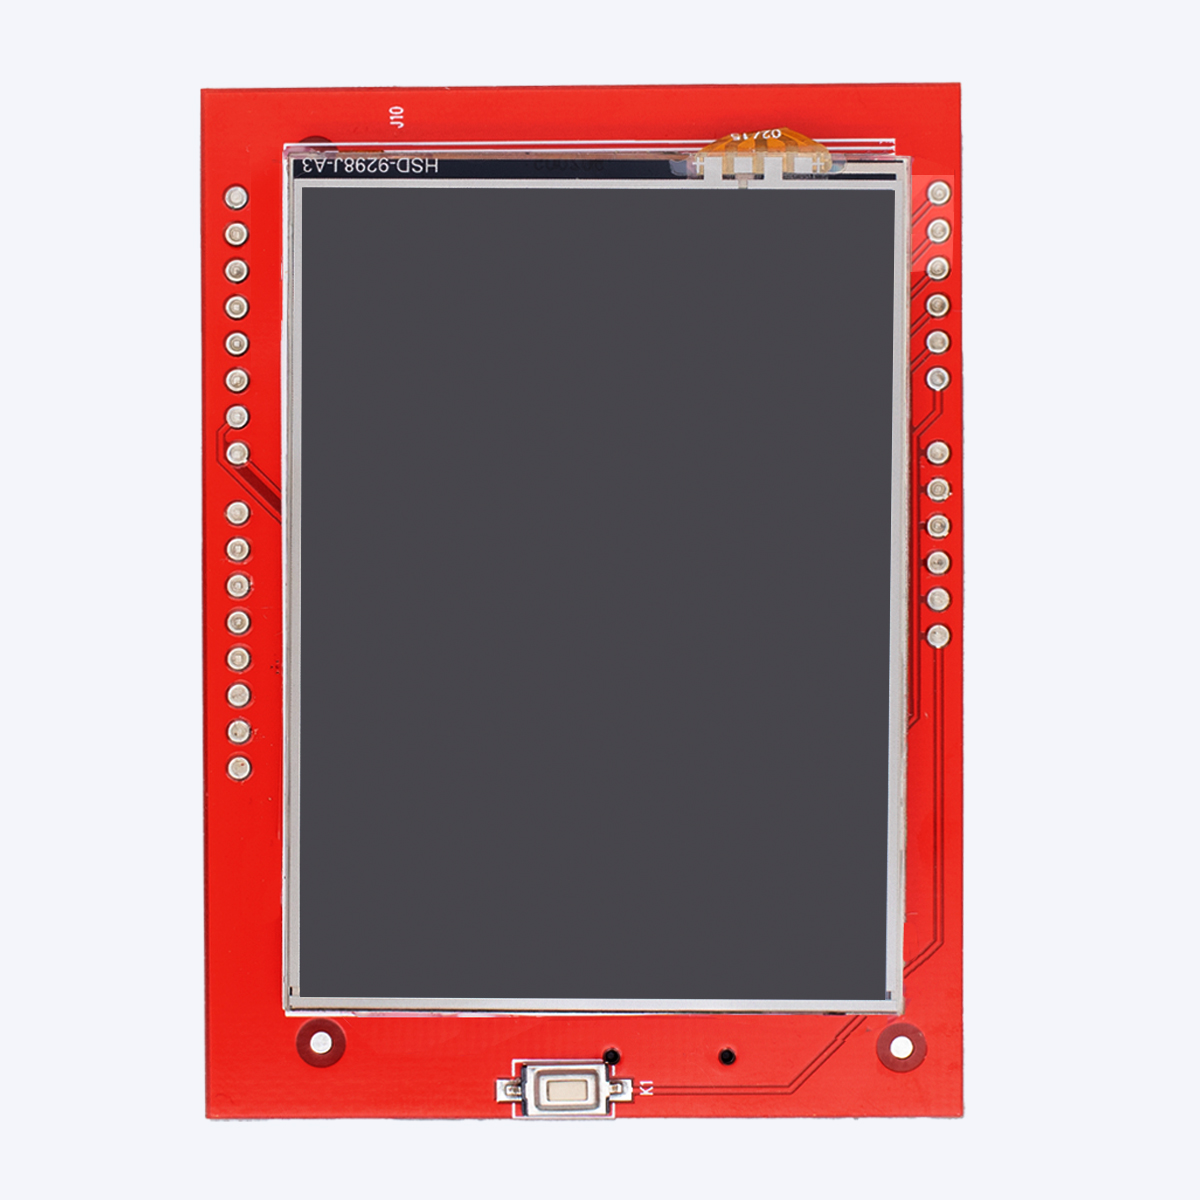
La Shield Display TFT 2.4″ Touch para Arduino Uno Mega es una pantalla táctil a color que permite visualizar datos, crear interfaces gráficas interactivas y mejorar la experiencia de usuario en proyectos electrónicos. Este dispositivo cuenta con:
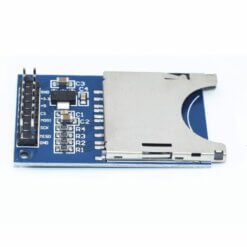
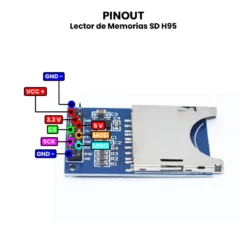
- Ranura para memoria microSD.
- Pantalla a color de 2.4 pulgadas.
- Resolución de 240 x 320 píxeles.
- Interfaz táctil.
Esta shield integra un panel táctil resistivo, ranura para tarjeta microSD y controladores compatibles con la mayoría de las librerías gráficas de Arduino, lo que la hace ideal para desarrollar menús, dashboards, controles interactivos, juegos simples y más. Es especialmente útil en proyectos donde se requiere una forma de entrada/salida intuitiva, como sistemas domóticos, estaciones meteorológicas, paneles de control o medidores digitales. Es totalmente compatible con placas de desarrollo Arduino Uno y Arduino Mega, y también puede utilizarse con otras tarjetas basadas en el mismo pinout o adaptadores adecuados. Su instalación directa sobre la placa Arduino simplifica el montaje, lo que la convierte en una opción muy popular entre makers, estudiantes y desarrolladores.
ESPECIFICACIONES Y CARACTERÍSTICAS
- Tipo: Shield TFT Touch.
- Tamaño de pantallas: 2.4″.
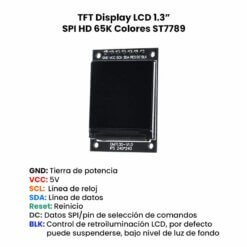
- Driver: ST7789V.
- Voltaje de funcionamiento: 5 V / 3.3 V.
- Consumo de energía: 90 mw.
- Interfaz: Paralela de 8 bits.
- Resolución: 320 x 240 px.
- Pantalla: RGB 65K color, 240×320 píxeles.
- Temperaturas:
- Funcionamiento: -20 °C a 70 °C.
- Almacenamiento: -40 °C a 70 °C.
- Dimensiones: 75 mm x 55 mm x 5 mm.
- Peso: 38 g.
DOCUMENTACIÓN Y RECURSOS
- Datasheet
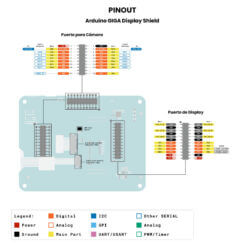
- Pinout
- Dimensiones
- Driver
- Librerías:
INFORMACIÓN ADICIONAL
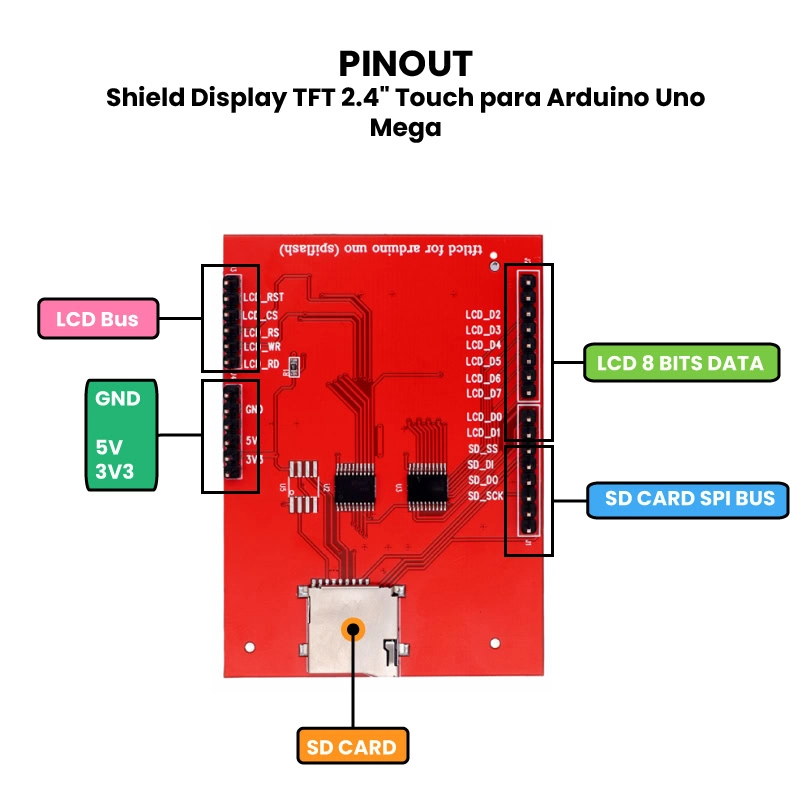
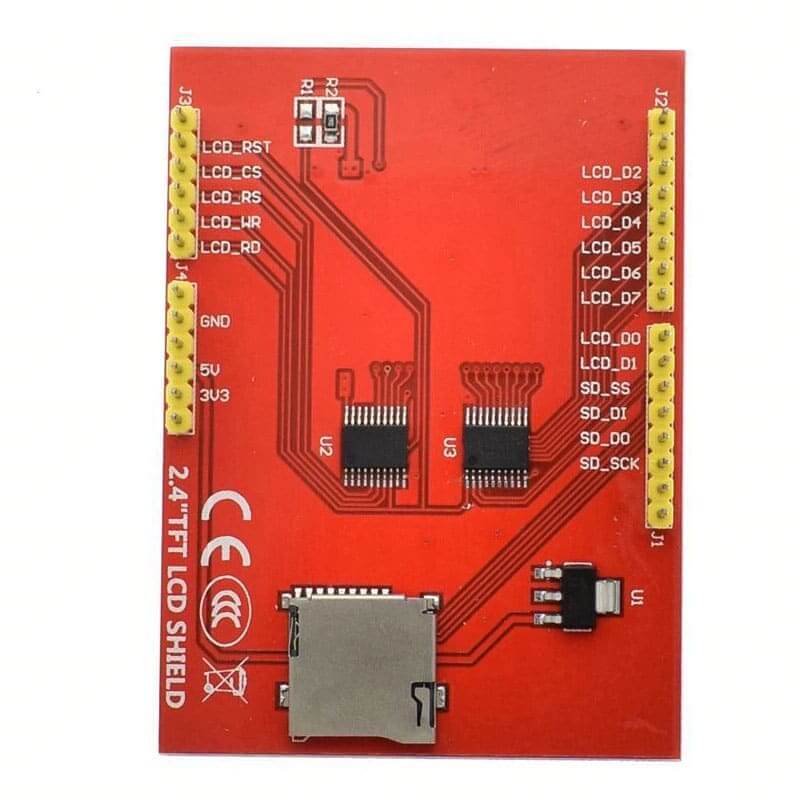
¿Cómo funciona el Shield Display TFT 2.4″ Touch?
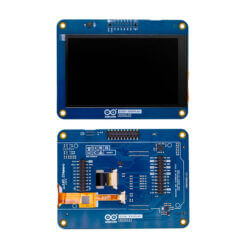
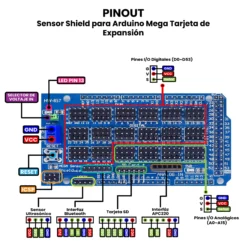
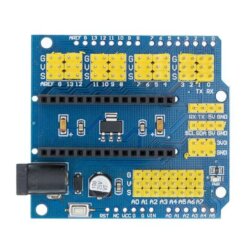
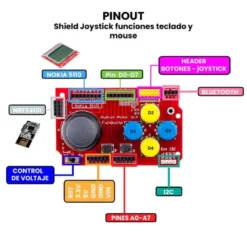
El LCD se controla mediante 8 pines de datos (2 – 9) y 5 pines de control (A0 – A4), la pantalla táctil comparte el bus de datos para enviar la posición 100% compatible con todos los formatos de Arduino (UNO, Mega, DUE, Leonardo, etc.).
Un TFT necesita un controlador que traduzca la información recibida en las señales necesarias de bajo nivel para controlar la electrónica del panel. Este controlador condicionará el esquema de conexión y el código que deberemos usar. Esta shield contiene una pantalla a color RGB 65K de 16 bits, muestra colores intensos, usa un bus paralelo de 8 bits, más rápido que la actualización SPI en serie, cuenta con un integrado de cambio de nivel de 5V / 3.3V, compatible con voltaje de operación de 5V / 3.3V fácil de expandir el experimento con la ranura para tarjetas SD.
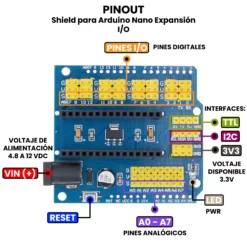
Pinout y Conexión con Arduino UNO R3:

Ejemplo de Funcionamiento de la Pantalla Color TFT Touch 2.4″:
-
Cargar las librerías al Arduino IDE.
Las librerías que utilizaremos son 5, estas se deben de cargar al Arduino IDE para que la pantalla touch funcione y evitar muchos errores que puedan surgir, lo primero que se debe de hacer es descargarlas:
En el siguiente video se ve un ejemplo de como importar las librerías al Arduino IDE:
Verificar la instalación de librerías.
Ya que se importaron las librerías al Arduino IDE se verifica que todo esté bien, para eso se abre el ejemplo de la librería “MCUFRIEND_kbv” llamado “TouchScreen_Calibr_native” y se compila, en el siguiente video se muestra un ejemplo de cómo hacer este paso:
Calibración del Touch.
Lo siguiente será montar la pantalla al Arduino Uno y después conectar al PC, en el Arduino IDE seleccionar la placa de Arduino Uno y el puerto COM que le asigno el PC, después se carga el ejemplo al Arduino Uno, ya que se cargó el código se deberá abrir el monitor y definirlo a 9600 baudios, se tendrá respuesta de la pantalla, después se deberá seguir el proceso de calibración que pedirá la pantalla, ya finalizado el proceso se imprimirán los valores de calibración al monitor serial los cuales se deberán copiar y se debe de minimizar la ventana del monitor serial. En el siguiente video se muestran los pasos que anteriormente se mencionaron y se muestra los pasos que se deben de seguir en la pantalla para configurar el touch:
Verificación de funcionamiento.
En el video anterior se muestra al final los parámetros de la correcta calibración del touch, estos parámetros servirán para remplazar los valores que vienen por defecto en los códigos de pruebas para hacer funciona el touch. Para este paso se mostrará el funcionamiento del touch utilizando el ejemplo de la librería “MCUFRIEND_kbv” llamado “Button_simple”, para esto hay que abrir ese ejemplo y antes de cargar el código en el Arduino se deberá remplazar los datos que se copiaron anteriormente en el monitor serial, en la siguiente imagen se muestra que parte de código se debe de remplazar:
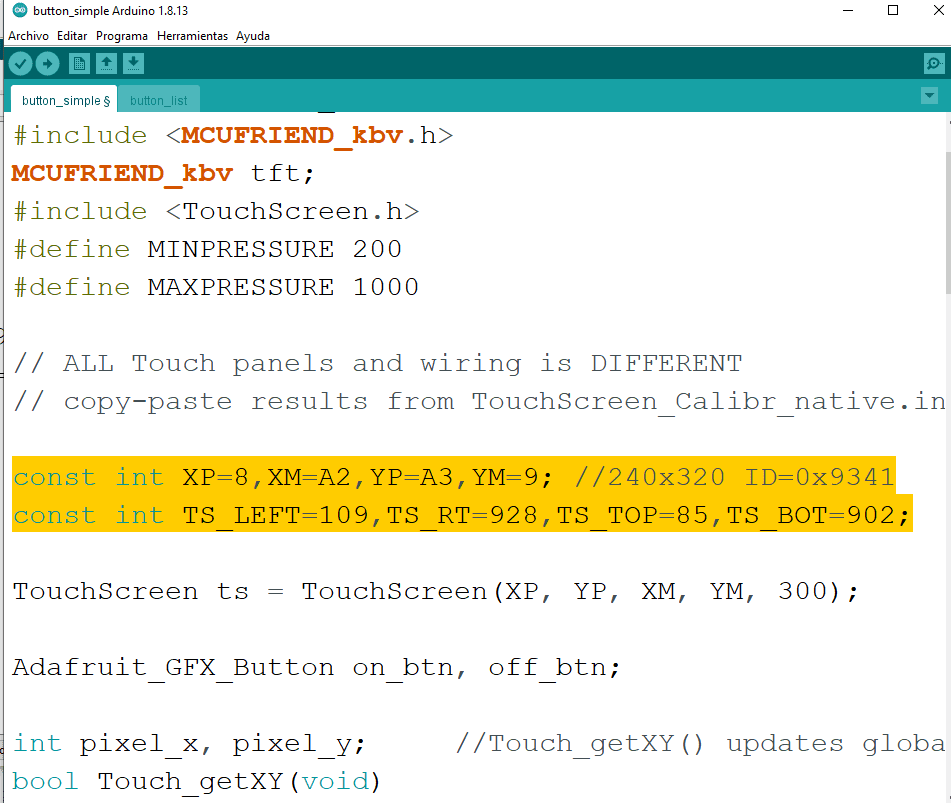
Ya que se remplazaron los datos de calibración en el código de ejemplo de “Button simple”, se deberá cargar el código al Arduino Uno y listo ya está funcionando el touch de la pantalla TFT. En el siguiente video tendrás el ejemplo de los pasos que se explicaron:
Pantalla en Blanco.
Muchas veces la dirección o ID de la pantalla puede cambiar, por lo que dejamos el siguiente código en donde podrás comprar el funcionamiento de la pantalla:
// IMPORTANT: Adafruit_TFTLCD LIBRARY MUST BE SPECIFICALLY
// CONFIGURED FOR EITHER THE TFT SHIELD OR THE BREAKOUT BOARD.
// SEE RELEVANT COMMENTS IN Adafruit_TFTLCD.h FOR SETUP.

#include <Adafruit_GFX.h>    // Core graphics library
#include <Adafruit_TFTLCD.h> // Hardware-specific library

// The control pins for the LCD can be assigned to any digital or
// analog pins...but we'll use the analog pins as this allows us to
// double up the pins with the touch screen (see the TFT paint example).
#define LCD_CS A3 // Chip Select goes to Analog 3
#define LCD_CD A2 // Command/Data goes to Analog 2
#define LCD_WR A1 // LCD Write goes to Analog 1
#define LCD_RD A0 // LCD Read goes to Analog 0

#define LCD_RESET A4 // Can alternately just connect to Arduino's reset pin

// When using the BREAKOUT BOARD only, use these 8 data lines to the LCD:
// For the Arduino Uno, Duemilanove, Diecimila, etc.:
//   D0 connects to digital pin 8  (Notice these are
//   D1 connects to digital pin 9   NOT in order!)
//   D2 connects to digital pin 2
//   D3 connects to digital pin 3
//   D4 connects to digital pin 4
//   D5 connects to digital pin 5
//   D6 connects to digital pin 6
//   D7 connects to digital pin 7
// For the Arduino Mega, use digital pins 22 through 29
// (on the 2-row header at the end of the board).

// Assign human-readable names to some common 16-bit color values:
#define	BLACK   0x0000
#define	BLUE    0x001F
#define	RED     0xF800
#define	GREEN   0x07E0
#define CYAN    0x07FF
#define MAGENTA 0xF81F
#define YELLOW  0xFFE0
#define WHITE   0xFFFF

Adafruit_TFTLCD tft(LCD_CS, LCD_CD, LCD_WR, LCD_RD, LCD_RESET);
// If using the shield, all control and data lines are fixed, and
// a simpler declaration can optionally be used:
// Adafruit_TFTLCD tft;

void setup(void) {
  Serial.begin(9600);
  Serial.println(F("TFT LCD test"));

#ifdef USE_ADAFRUIT_SHIELD_PINOUT
  Serial.println(F("Using Adafruit 2.8\" TFT Arduino Shield Pinout"));
#else
  Serial.println(F("Using Adafruit 2.8\" TFT Breakout Board Pinout"));
#endif

  Serial.print("TFT size is "); Serial.print(tft.width()); Serial.print("x"); Serial.println(tft.height());

  tft.reset();

  /*uint16_t identifier = tft.readID();

  if(identifier == 0x9325) {
    Serial.println(F("Found ILI9325 LCD driver"));
  } else if(identifier == 0x9328) {
    Serial.println(F("Found ILI9328 LCD driver"));
  } else if(identifier == 0x7575) {
    Serial.println(F("Found HX8347G LCD driver"));
  } else if(identifier == 0x9341) {
    Serial.println(F("Found ILI9341 LCD driver"));
  } else if(identifier == 0x8357) {
    Serial.println(F("Found HX8357D LCD driver"));
  } else {
    Serial.print(F("Unknown LCD driver chip: "));
    Serial.println(identifier, HEX);
    Serial.println(F("If using the Adafruit 2.8\" TFT Arduino shield, the line:"));
    Serial.println(F("  #define USE_ADAFRUIT_SHIELD_PINOUT"));
    Serial.println(F("should appear in the library header (Adafruit_TFT.h)."));
    Serial.println(F("If using the breakout board, it should NOT be #defined!"));
    Serial.println(F("Also if using the breakout, double-check that all wiring"));
    Serial.println(F("matches the tutorial."));
    return;
  }
*/
  tft.begin(0x8357);

  Serial.println(F("Benchmark                Time (microseconds)"));

  Serial.print(F("Screen fill              "));
  Serial.println(testFillScreen());
  delay(500);

  Serial.print(F("Text                     "));
  Serial.println(testText());
  delay(3000);

  Serial.print(F("Lines                    "));
  Serial.println(testLines(CYAN));
  delay(500);

  Serial.print(F("Horiz/Vert Lines         "));
  Serial.println(testFastLines(RED, BLUE));
  delay(500);

  Serial.print(F("Rectangles (outline)     "));
  Serial.println(testRects(GREEN));
  delay(500);

  Serial.print(F("Rectangles (filled)      "));
  Serial.println(testFilledRects(YELLOW, MAGENTA));
  delay(500);

  Serial.print(F("Circles (filled)         "));
  Serial.println(testFilledCircles(10, MAGENTA));

  Serial.print(F("Circles (outline)        "));
  Serial.println(testCircles(10, WHITE));
  delay(500);

  Serial.print(F("Triangles (outline)      "));
  Serial.println(testTriangles());
  delay(500);

  Serial.print(F("Triangles (filled)       "));
  Serial.println(testFilledTriangles());
  delay(500);

  Serial.print(F("Rounded rects (outline)  "));
  Serial.println(testRoundRects());
  delay(500);

  Serial.print(F("Rounded rects (filled)   "));
  Serial.println(testFilledRoundRects());
  delay(500);

  Serial.println(F("Done!"));
}

void loop(void) {
  for(uint8_t rotation=0; rotation<4; rotation++) {
    tft.setRotation(rotation);
    testText();
    delay(2000);
  }
}

unsigned long testFillScreen() {
  unsigned long start = micros();
  tft.fillScreen(BLACK);
  tft.fillScreen(RED);
  tft.fillScreen(GREEN);
  tft.fillScreen(BLUE);
  tft.fillScreen(BLACK);
  return micros() - start;
}

unsigned long testText() {
  tft.fillScreen(BLACK);
  unsigned long start = micros();
  tft.setCursor(0, 0);
  tft.setTextColor(WHITE);  tft.setTextSize(1);
  tft.println("Hello World!");
  tft.setTextColor(YELLOW); tft.setTextSize(2);
  tft.println(1234.56);
  tft.setTextColor(RED);    tft.setTextSize(3);
  tft.println(0xDEADBEEF, HEX);
  tft.println();
  tft.setTextColor(GREEN);
  tft.setTextSize(5);
  tft.println("Groop");
  tft.setTextSize(2);
  tft.println("I implore thee,");
  tft.setTextSize(1);
  tft.println("my foonting turlingdromes.");
  tft.println("And hooptiously drangle me");
  tft.println("with crinkly bindlewurdles,");
  tft.println("Or I will rend thee");
  tft.println("in the gobberwarts");
  tft.println("with my blurglecruncheon,");
  tft.println("see if I don't!");
  return micros() - start;
}

unsigned long testLines(uint16_t color) {
  unsigned long start, t;
  int           x1, y1, x2, y2,
                w = tft.width(),
                h = tft.height();

  tft.fillScreen(BLACK);

  x1 = y1 = 0;
  y2    = h - 1;
  start = micros();
  for(x2=0; x2<w; x2+=6) tft.drawLine(x1, y1, x2, y2, color);
  x2    = w - 1;
  for(y2=0; y2<h; y2+=6) tft.drawLine(x1, y1, x2, y2, color);
  t     = micros() - start; // fillScreen doesn't count against timing

  tft.fillScreen(BLACK);

  x1    = w - 1;
  y1    = 0;
  y2    = h - 1;
  start = micros();
  for(x2=0; x2<w; x2+=6) tft.drawLine(x1, y1, x2, y2, color);
  x2    = 0;
  for(y2=0; y2<h; y2+=6) tft.drawLine(x1, y1, x2, y2, color);
  t    += micros() - start;

  tft.fillScreen(BLACK);

  x1    = 0;
  y1    = h - 1;
  y2    = 0;
  start = micros();
  for(x2=0; x2<w; x2+=6) tft.drawLine(x1, y1, x2, y2, color);
  x2    = w - 1;
  for(y2=0; y2<h; y2+=6) tft.drawLine(x1, y1, x2, y2, color);
  t    += micros() - start;

  tft.fillScreen(BLACK);

  x1    = w - 1;
  y1    = h - 1;
  y2    = 0;
  start = micros();
  for(x2=0; x2<w; x2+=6) tft.drawLine(x1, y1, x2, y2, color);
  x2    = 0;
  for(y2=0; y2<h; y2+=6) tft.drawLine(x1, y1, x2, y2, color);

  return micros() - start;
}

unsigned long testFastLines(uint16_t color1, uint16_t color2) {
  unsigned long start;
  int           x, y, w = tft.width(), h = tft.height();

  tft.fillScreen(BLACK);
  start = micros();
  for(y=0; y<h; y+=5) tft.drawFastHLine(0, y, w, color1);
  for(x=0; x<w; x+=5) tft.drawFastVLine(x, 0, h, color2);

  return micros() - start;
}

unsigned long testRects(uint16_t color) {
  unsigned long start;
  int           n, i, i2,
                cx = tft.width()  / 2,
                cy = tft.height() / 2;

  tft.fillScreen(BLACK);
  n     = min(tft.width(), tft.height());
  start = micros();
  for(i=2; i<n; i+=6) {
    i2 = i / 2;
    tft.drawRect(cx-i2, cy-i2, i, i, color);
  }

  return micros() - start;
}

unsigned long testFilledRects(uint16_t color1, uint16_t color2) {
  unsigned long start, t = 0;
  int           n, i, i2,
                cx = tft.width()  / 2 - 1,
                cy = tft.height() / 2 - 1;

  tft.fillScreen(BLACK);
  n = min(tft.width(), tft.height());
  for(i=n; i>0; i-=6) {
    i2    = i / 2;
    start = micros();
    tft.fillRect(cx-i2, cy-i2, i, i, color1);
    t    += micros() - start;
    // Outlines are not included in timing results
    tft.drawRect(cx-i2, cy-i2, i, i, color2);
  }

  return t;
}

unsigned long testFilledCircles(uint8_t radius, uint16_t color) {
  unsigned long start;
  int x, y, w = tft.width(), h = tft.height(), r2 = radius * 2;

  tft.fillScreen(BLACK);
  start = micros();
  for(x=radius; x<w; x+=r2) {
    for(y=radius; y<h; y+=r2) {
      tft.fillCircle(x, y, radius, color);
    }
  }

  return micros() - start;
}

unsigned long testCircles(uint8_t radius, uint16_t color) {
  unsigned long start;
  int           x, y, r2 = radius * 2,
                w = tft.width()  + radius,
                h = tft.height() + radius;

  // Screen is not cleared for this one -- this is
  // intentional and does not affect the reported time.
  start = micros();
  for(x=0; x<w; x+=r2) {
    for(y=0; y<h; y+=r2) {
      tft.drawCircle(x, y, radius, color);
    }
  }

  return micros() - start;
}

unsigned long testTriangles() {
  unsigned long start;
  int           n, i, cx = tft.width()  / 2 - 1,
                      cy = tft.height() / 2 - 1;

  tft.fillScreen(BLACK);
  n     = min(cx, cy);
  start = micros();
  for(i=0; i<n; i+=5) {
    tft.drawTriangle(
      cx    , cy - i, // peak
      cx - i, cy + i, // bottom left
      cx + i, cy + i, // bottom right
      tft.color565(0, 0, i));
  }

  return micros() - start;
}

unsigned long testFilledTriangles() {
  unsigned long start, t = 0;
  int           i, cx = tft.width()  / 2 - 1,
                   cy = tft.height() / 2 - 1;

  tft.fillScreen(BLACK);
  start = micros();
  for(i=min(cx,cy); i>10; i-=5) {
    start = micros();
    tft.fillTriangle(cx, cy - i, cx - i, cy + i, cx + i, cy + i,
      tft.color565(0, i, i));
    t += micros() - start;
    tft.drawTriangle(cx, cy - i, cx - i, cy + i, cx + i, cy + i,
      tft.color565(i, i, 0));
  }

  return t;
}

unsigned long testRoundRects() {
  unsigned long start;
  int           w, i, i2,
                cx = tft.width()  / 2 - 1,
                cy = tft.height() / 2 - 1;

  tft.fillScreen(BLACK);
  w     = min(tft.width(), tft.height());
  start = micros();
  for(i=0; i<w; i+=6) {
    i2 = i / 2;
    tft.drawRoundRect(cx-i2, cy-i2, i, i, i/8, tft.color565(i, 0, 0));
  }

  return micros() - start;
}

unsigned long testFilledRoundRects() {
  unsigned long start;
  int           i, i2,
                cx = tft.width()  / 2 - 1,
                cy = tft.height() / 2 - 1;

  tft.fillScreen(BLACK);
  start = micros();
  for(i=min(tft.width(), tft.height()); i>20; i-=6) {
    i2 = i / 2;
    tft.fillRoundRect(cx-i2, cy-i2, i, i, i/8, tft.color565(0, i, 0));
  }

  return micros() - start;
}
En esté código, se comenta las siguientes líneas:
/*uint16_t identifier = tft.readID();

  if(identifier == 0x9325) {
    Serial.println(F("Found ILI9325 LCD driver"));
  } else if(identifier == 0x9328) {
    Serial.println(F("Found ILI9328 LCD driver"));
  } else if(identifier == 0x7575) {
    Serial.println(F("Found HX8347G LCD driver"));
  } else if(identifier == 0x9341) {
    Serial.println(F("Found ILI9341 LCD driver"));
  } else if(identifier == 0x8357) {
    Serial.println(F("Found HX8357D LCD driver"));
  } else {
    Serial.print(F("Unknown LCD driver chip: "));
    Serial.println(identifier, HEX);
    Serial.println(F("If using the Adafruit 2.8\" TFT Arduino shield, the line:"));
    Serial.println(F("  #define USE_ADAFRUIT_SHIELD_PINOUT"));
    Serial.println(F("should appear in the library header (Adafruit_TFT.h)."));
    Serial.println(F("If using the breakout board, it should NOT be #defined!"));
    Serial.println(F("Also if using the breakout, double-check that all wiring"));
    Serial.println(F("matches the tutorial."));
    return;
  }
*/
Y se módifica la siguiente línea: tft.begin(0x8357); (aquí se debe poner entre los parantesis la dirección que haya funciona para ello, será a prueba y error intentando con cada una de las dirección que aparecen en las líneas anteriores de “identifier == 00×000”).
ENLACES EXTERNOS
| Peso | 0.038 kg |
|---|---|
| Dimensiones | 7.5 × 0.5 × 5.5 cm |
| TIPO DE SHIELD: | MULTIFUNCIÓN |
| FORMATO: | MEGA, UNO |
Solo los usuarios registrados que hayan comprado este producto pueden hacer una valoración.
También te recomendamos…


Productos relacionados


COMPATIBLES CON ARDUINO
Valoraciones
No hay valoraciones aún.